Using the storage features
List of storage features
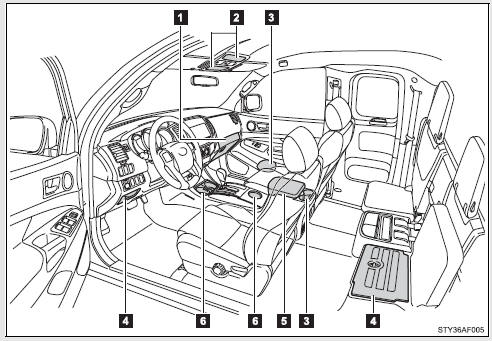
 Glove box
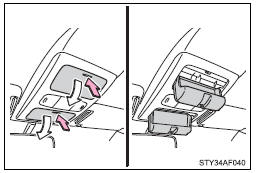
 Overhead console (Access Cab and Double Cab models)
 Bottle holders
 Auxiliary boxes
 Front console box (separated type front seat only)
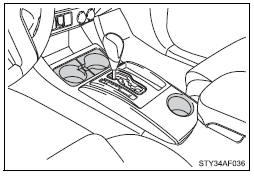
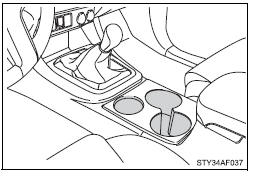
 Cup holders
CAUTION
■Items that should not be left in the storage spaces
Do not leave glasses, lighters or spray cans in the storage spaces, as this may result in the following when cabin temperature becomes high: ●Glasses may be deformed by heat or cracked if they come into contact with other stored items.
●Lighters or spray cans may explode. If they come into contact with other stored items, the lighter may catch fire or the spray can may release gas, causing a fire hazard.
Glove box
Pull up the lever.
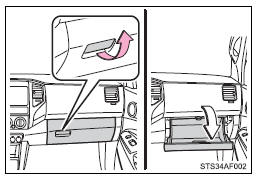
CAUTION
■Caution while driving
Keep the glove box closed. In the event of sudden braking or sudden swerving, an accident may occur due to an occupant being struck by the open glove box or the items stored inside.
Front console box (Separated type front seat only)
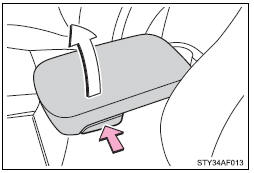
Push the button.
CAUTION
■Caution while driving
Keep the console box closed.
Injuries may result in the event of an accident or sudden braking.
Cup holders
 Type A (Bench type front seat)
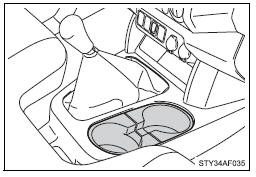
 Type B (Separated type front seats with an automatic transmission)
 Type C (Separated type front seats with a manual transmission)
■Removing the cup holder
 Type A (Bench type front seat)
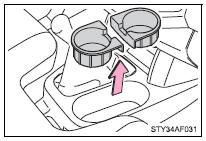
Pull the cup holder up.
 Type B (Separated type front seats with an automatic transmission)

Pull the cup holder up.
CAUTION
■Items unsuitable for the cup holder
Do not place anything other than cups or aluminum cans in the cup holders.
Other items may be thrown out of the holders in the event of an accident or sudden braking and cause injury. If possible, cover hot drinks to prevent burns.
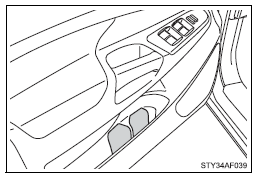
Bottle holders
 Front
Front
 Front console box (Separated type front seat)
 Rear (Double Cab models)
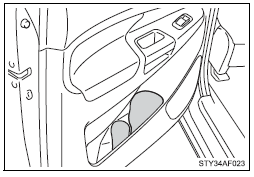
■Bottle holders
Depending on their size or shape, some bottles may not fit in the holders.
NOTICE
■Items that should not be stowed in the bottle holders
Put the cap on before stowing a bottle. Do not place open bottles in the bottle holders, or glasses and paper cups containing liquid. The contents may spill and glasses may break.
Auxiliary boxes
 Front
Front

Pull the lid down.
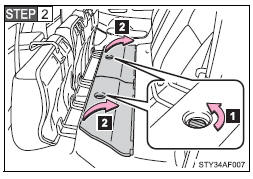
Under the rear seats (Access Cab models)
 Pull up the lever.
 Raise the bottom cushion up.
Turn the knob counterclockwise.
 Open the lid.
 Press the lid against the bottom of the lower cushion until it is supported by the hookand- loop fastener.
Make sure that the lid is supported to prevent it from closing unexpectedly.
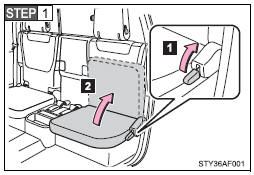
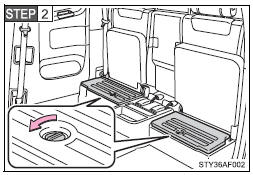
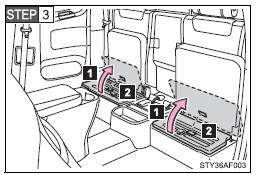
 Under the rear seats (Double Cab models)
Swing the bottom cushion up by pulling the lock release strap.
 Turn the knob counterclockwise.
 Open the lid.
CAUTION
■Caution while driving
Keep the auxiliary boxes closed and locked.
Injuries may result in the event of an accident or sudden braking.
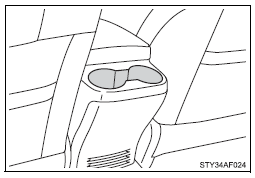
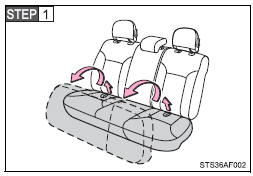
Overhead console (Access Cab and Double Cab models)
The overhead console is useful for temporarily storing sunglasses and similar small items.
Pull the lid down while pushing the knob.
CAUTION
■Caution while driving
Keep the overhead console closed.
Injuries may result in the event of an accident or sudden braking.
■Items unsuitable for storing
Do not store items heavier than 0.4 lb. (0.2 kg).
Doing so may cause the overhead console to open and the items inside may fall out, resulting in an accident.
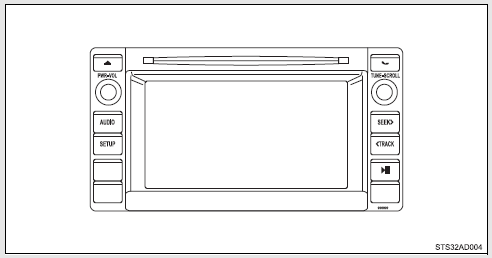
Multimedia system types
 Entune Audio
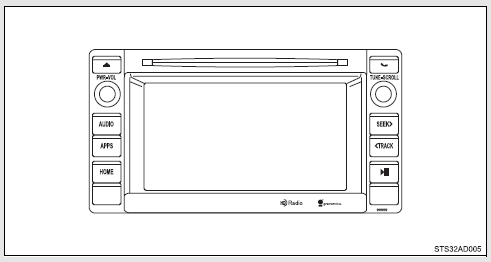
 Entune Audio Plus
Refer to the “NAVIGATION SYSTEM OWNER’S MANUAL”.
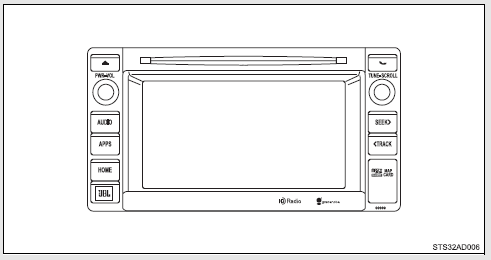
 Entune Premium Audio
Refer to the “NAVIGATION SYSTEM OWNER’S MANUAL”.
Entune Audio
Operations such as listening to audio, using the hands-free phone, confirming vehicle information and changing multimedia system settings are started by using the following buttons.
Multimedia system operation buttons
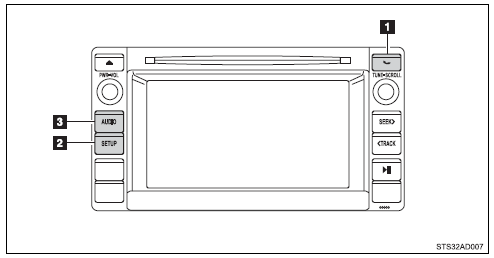

 button
Press this button to access the Bluetooth® hands-free system.
 “SETUP” button
Press this button to customize the function settings.
 “AUDIO” button
Display the “Select Audio Source” screen or audio control screen.
Operating the touch screen
By touching the screen with your finger, you can control the Audio, hands-free system, etc.
■ Drag*
Touch the screen with your finger and move the screen to the desired position.
● Scrolling the lists
● Using scroll bar in lists
■ Flick*
Touch the screen with your finger and then quickly move the screen.
● Scrolling the main screen page
● Returning to the menu screen from the sub-menu screen (screen one level below)
*: The above operations may not be performed on all screens.
■When using the touch screen
●If the screen is cold, the display may be dark, or the system may seem to be operating slightly slower than normal.
●The screen may seem dark and hard to see when viewed through sunglasses.
Change your angle of viewing, adjust the display on the “Display Settings” screen (→P. 263) or remove your sunglasses.
■Using cellular phones
Interference may be heard through the multimedia system’s speakers if a cellular phone is being used inside or close to the vehicle while the multimedia system is operating.
CAUTION
■For vehicles sold in U.S.A. and Canada
●Part 15 of the FCC Rules
FCC Warning: Any unauthorized changes or modifications to this equipment will void the user’s authority to operate this device.
●Laser products
This product is a class 1 laser product.
Do not open the cover of the player or attempt to repair the unit yourself.
Refer servicing to qualified personnel.
• Do not take this unit apart or attempt to make any changes yourself.
This is an intricate unit that uses a laser pickup to retrieve information from the surface of compact discs. The laser is carefully shielded so that its rays remain inside the cabinet. Therefore, never try to disassemble the player or alter any of its parts since you may be exposed to laser rays and dangerous voltages.
• This product utilizes a laser.
Use of controls or adjustments or performance of procedures other than those specified herein may result in hazardous radiation exposure.
THE USE OF OPTICAL INSTRUMENTS WITH THIS PRODUCT WILL INCREASE EYE HAZARD.
NOTICE
■To avoid damaging the touch screen
●To prevent damaging the screen, lightly touch the screen buttons with your finger.
●Do not use objects other than your finger to touch the screen.
●Wipe off fingerprints using a glass cleaning cloth. Do not use chemical cleaners to clean the screen, as they may damage the touch screen.
■To prevent battery discharge
Do not leave the multimedia system on longer than necessary when the engine is off.
■To avoid damaging the multimedia system
Take care not to spill drinks or other fluids on the multimedia system.
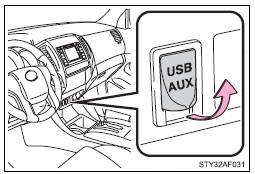
USB port/AUX port
Connect an iPod, USB memory device or portable audio player to the USB port/AUX port as indicated below. Select “iPod”, “USB” or “AUX” on the “Select Audio Source” screen and the device can be operated via multimedia system.
Connecting using the USB port/AUX port
■ iPod
Open the cover and connect an iPod using an iPod cable.
Turn on the power of the iPod if it is not turned on.
■ USB memory
Open the cover and connect the USB memory device.
Turn on the power of the USB memory device if it is not turned on.
■ Portable audio player
Open the cover and connect the portable audio player.
Turn on the power of the portable audio player if it is not turned on.
CAUTION
■While driving
Do not connect a device or operate the device controls.
Setup menu
You can adjust the multimedia system to your desired settings.
Display “Setup” screen
Press the “SETUP” button to display the “Setup” screen.
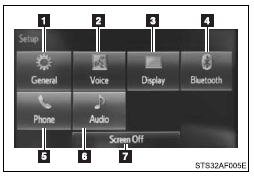
 Select to adjust the settings for operation sounds, screen animation, etc.
 Select to set the voice settings.
 Select to adjust the settings for contrast and brightness of the screen.
 Select to adjust the settings for registering, removing, connecting and disconnecting Bluetooth® devices.
 Select to adjust the settings for phone sound, contact, etc.
 Select to set audio settings.
 Select to turn the screen off.
General settings
Settings are available for adjusting the operation sounds, screen animation, etc.
■ Screen for general settings
 Press the “SETUP” button.
 Select “General” on the “Setup” screen.
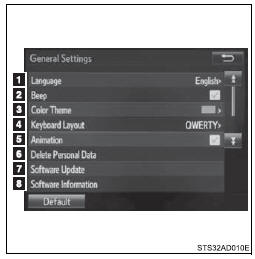
1. “English”, “Français” or “Español” can be selected.
2. On/off can be selected to sound beeps.
3. Select to change the screen color.
4. Select to change the keyboard layout.
5. The animation effect for the screen can be set to on/off.
6. Select to delete personal data
7. Select to update program versions.
For details, contact your Toyota dealer.
8. Select to display the software information. Notices related to third party software used in this product are enlisted. (This includes instructions for obtaining such software, where applicable.)
■To return to the default settings
Select “Default”, and then “Yes”.
■ Delete personal data
 Select “Delete Personal Data” on the “General Settings” screen.
 Select “Delete”.
Check carefully beforehand, as data cannot be retrieved once deleted.
 A confirmation screen will be displayed. Select “Yes”.
The following personal data will be deleted or changed to its default settings.
• General settings
• Audio settings
• Phone settings
Audio settings
Settings are available for adjusting the radio operation, cover art, etc.
■ Screen for audio settings
 Press the “SETUP” button.
 Select “Audio” on the “Setup” screen.
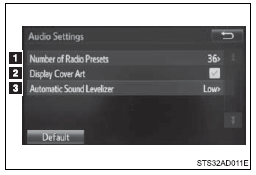
 Select the number of radio preset stations.
 Select to display the cover art
 Select “High”, “Middle”, “Low” or “Off”.
■About Automatic Sound Leveliser (ASL)
ASL automatically adjusts the volume and tone quality according to the vehicle speed.
Display settings
Settings are available for adjusting the contrast and brightness of the screen.
■ Screen for display settings
 Press the “SETUP” button.
 Select “Display” on the “Setup” screen.
 Adjust general screen contrast/ brightness
 Adjust camera screen contrast/ brightness
 Changes to day mode.
■ Adjusting the screen contrast/brightness
 Select “General” or “Camera” on the “Display Settings” screen.
 Adjust the display as desired by selecting “+” or “-”.
■ Day mode
When the headlights are turned on, the screen dims.
However, the screen can be switched to day mode by selecting “Day Mode”.
The screen will stay in day mode when the headlights are turned on until “Day Mode” is selected again.
Voice settings
This screen is used for guidance for voice command systems setting.
 Adjust the voice guidance volume setting.
 Set the voice recognition prompts “High”, “Low” or “Off”.
 Set the train voice recognition.
 Set the voice prompt interrupt on/off.
 Voice recognition tutorial
Basic audio operations
Basic audio operations and functions common to each mode are explained in this section.
Operating the multimedia system
1. Press this button to eject a disc
2. Insert a disc into the disc slot
3.“Select Audio Source” screen appears
4. Turn this knob to select radio station bands, tracks and files. Also the knob can be used to select items in the list display.
5. Press the “<TRACK” or “SEEK>” button to seek up or down for a radio station, or to access a desired track or file.
6. Press to pause or resume playing music.
7. Setting the Sound
8.Pause or resume playing music
9.Select to enable repeat play
10. Select to enable random playback
11.Press this knob to turn the multimedia system on and off, and turn it to adjust the volume.
Selecting the audio source
 Press the “AUDIO” button.
 Select “Source” on the audio control screen or press the “AUDIO” button again.
Select the desired audio source.
■ Reordering the audio source
 Select “Reorder”.
 Select the desired audio source then
  or
or  to reorder.
 Select “OK”.
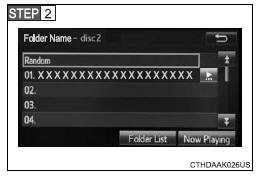
List screen operation
When a list style screen is displayed, use the appropriate buttons to scroll through the list.
■ How to scroll
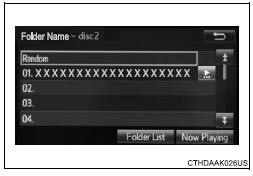
 Select to scroll to the next or previous page.
 If
If  appears to the right of titles, the complete titles are too long for the display.
Select this button to scroll the title.
Turn the “TUNE·SCROLL” knob to move the cursor box to select a desired item from the list, and press the “TUNE·SCROLL” knob to play it. The track that is being played is highlighted.
To return to the top screen, select “Now Playing” on the list screen.
■ Selecting, fast-forwarding and reversing tracks/files/songs
● Selecting a track/file/song
Press the “<TRACK” or “SEEK>” button or turn the “TUNE·SCROLL” knob to select the desired track/file/song number.
To fast-forward or reverse, press and hold the “<TRACK” or “SEEK>” button.
● Selecting a track/file/song from the track/file/song list
 Select “Browse” or cover art.
Select the desired track/file/ song.
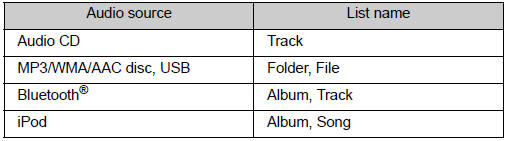
When an MP3/WMA/AAC disc or USB memory device is being used, the folder can be selected. When a Bluetooth® device or iPod is being used, the album can be selected.
According to the audio device, the following is displayed.
Sound settings
On the “Sound Settings” screen, sound quality (Treble/Mid/Bass), volume balance can be adjusted.
■ Tone and balance
Select “Sound” on the audio control screen to adjust the sound settings.
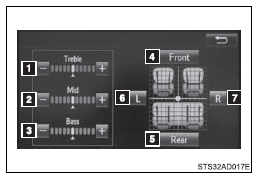
 Select “-” or “+” to adjust the treble, mid or bass to a level between -5 and 5.
 Select “Front” or “Rear” to adjust the front/rear audio balance.
 Select “L” or “R” to adjust the left/right audio balance.
■The sound quality level is adjusted individually
The treble, mid and bass levels can be adjusted for each audio mode separately.
Using the radio
Select “AM” or “FM” on the “Select Audio Source” screen to begin listening to the radio.
Audio control screen
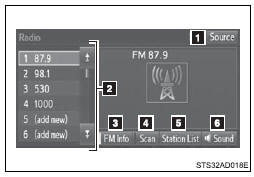
 “Select Audio Source” screen appears
 Preset stations
 Select to display RBDS text message
 Scanning for receivable station
 Select to display a list of receivable stations
 Setting the sound
Selecting a station
Tune in to the desired station using one of the following methods.
■ Seek tuning
Press the “<TRACK” or “SEEK>” button.
The radio will begin seeking up or down for a station of the nearest frequency and will stop when a station is found.
■ Manual tuning
Turn the “TUNE·SCROLL” knob.
■ Preset stations
Select the desired preset station.
Setting station presets
 Search for desired stations by turning the “TUNE·SCROLL” knob or pressing the “<TRACK” or “SEEK>” button.
 Select “(add new)”
To change the preset station to a different one, select and hold the preset station.
 Select “Yes
 Select “OK” after setting the new preset station.
■ Refreshing the station list
 Select “Refresh” on the “Station List” screen.
To cancel the refresh, select “Cancel Refresh”.
■Reception sensitivity
●Maintaining perfect radio reception at all times is difficult due to the continually changing position of the antenna, differences in signal strength and surrounding objects, such as trains, transmitters, etc.
●The radio antenna is mounted inside the rear quarter window. To maintain clear radio reception, do not attach metallic window tinting or other metallic objects to the antenna wire mounted inside the rear quarter window.
Playing an audio CD and MP3/WMA/AAC discs
Insert disc or select “CD” on the “Select Audio Source” screen to begin listening to a CD.
Audio control screen
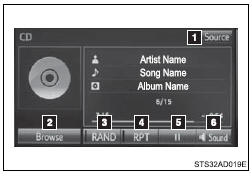
1. “Select Audio Source” screen appears
2.  Audio CD
Displaying the track list
 MP3/WMA/AAC
Displaying the folder list
3. Random playback
4. Repeat play
5. Pause
Select  to resume play
6. Setting the sound
■Displaying the title and artist name
If a CD-TEXT disc is inserted, the title of the disc and track will be displayed.
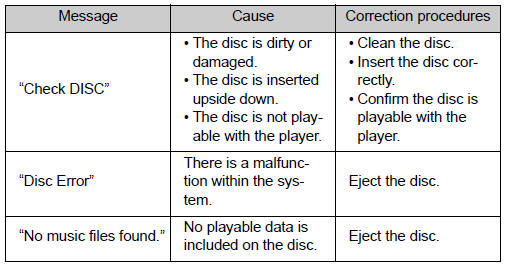
■Error messages
If an error message is displayed, refer to the following table and take the appropriate measures. If the problem is not rectified, take the vehicle to your Toyota dealer.
■Discs that can be used
Discs with the marks shown below can be used.
Playback may not be possible depending on recording format or disc features, or due to scratches, dirt or deterioration.

CDs with copy-protection features may not play correctly.
■CD player protection feature
To protect the internal components, playback is automatically stopped when a problem is detected.
■If a disc is left inside the CD player or in the ejected position for extended periods
Disc may be damaged and may not play properly.
■Lens cleaners
Do not use lens cleaners. Doing so may damage the CD player.
■MP3, WMA and AAC files
MP3 (MPEG Audio LAYER3) is a standard audio compression format.
Files can be compressed to approximately 1/10 of their original size by using MP3 compression.
WMA (Windows Media Audio) is a Microsoft audio compression format.
This format compresses audio data to a size smaller than that of the MP3 format.
AAC is short for Advanced Audio Coding and refers to an audio compression technology standard used with MPEG2 and MPEG4.
MP3, WMA and AAC file and media/formats compatibility are limited.
●MP3 file compatibility
• Compatible standards
MP3 (MPEG1 LAYER3, MPEG2 LSF LAYER3)
• Compatible sampling frequencies
MPEG1 LAYER3: 32, 44.1, 48 (kHz)
MPEG2 LSF LAYER3: 16, 22.05, 24 (kHz)
• Compatible bit rates (compatible with VBR)
MPEG1 LAYER3: 32-320 (kbps)
MPEG2 LSF LAYER3: 8-160 (kbps)
• Compatible channel modes: stereo, joint stereo, dual channel and monaural
●WMA file compatibility
• Compatible standards WMA Ver. 7, 8, 9
• Compatible sampling frequencies 32, 44.1, 48 (kHz)
• Compatible bit rates (only compatible with 2-channel playback)
Ver. 7, 8: CBR 48-192 (kbps)
Ver. 9: CBR 48-320 (kbps)
●AAC file compatibility
• Compatible standards MPEG4/AAC-LC
• Compatible sampling frequencies 11.025/12/16/22.05/24/32/44.1/48 (kHz)
• Compatible bit rates 16-320 (kbps)
●Compatible media
Media that can be used for MP3, WMA and AAC playback are CD-Rs and CD-RWs.
Playback in some instances may not be possible if the CD-R or CD-RW is not finalized. Playback may not be possible or the audio may jump if the disc is scratched or marked with fingerprints.
●Compatible disc formats
The following disc formats can be used.
• Disc formats: CD-ROM Mode 1 and Mode 2
CD-ROM XA Mode 2, Form 1 and Form 2
• File formats: ISO9660 Level 1, Level 2, (Romeo, Joliet)
UDF (2.01 or lower)
MP3, WMA and AAC files written in any format other than those listed above may not play correctly, and their file names and folder names may not be displayed correctly.
Items related to standards and limitations are as follows.
• Maximum directory hierarchy: 8 levels (including the root)
• Maximum length of folder names/file names: 32 characters
• Maximum number of folders: 192 (including the root)
• Maximum number of files per disc: 255
●File names
The only files that can be recognized as MP3/WMA/AAC and played are those with the extension .mp3, .wma or .m4a.
●Discs containing multi-session recordings
As the multimedia system is compatible with multi session discs, it is possible to play discs that contain MP3, WMA and AAC files. However, only the first session can be played.
●ID3, WMA and AAC tags
ID3 tags can be added to MP3 files, making it possible to record the track title, artist name, etc.
The system is compatible with ID3 Ver. 1.0, 1.1, and Ver. 2.2, 2.3 ID3 tags.
(The number of characters is based on ID3 Ver. 1.0 and 1.1.) WMA tags can be added to WMA files, making it possible to record the track title and artist name in the same way as with ID3 tags.
AAC tags can be added to AAC files, making it possible to record the track title and artist name in the same way as with ID3 tags.
●MP3, WMA and AAC playback
When a disc containing MP3, WMA or AAC files is inserted, all files on the disc are first checked. Once the file check is finished, the first MP3, WMA or AAC file is played. To make the file check finish more quickly, we recommend you do not write any files to the disc other than MP3, WMA or AAC files or create any unnecessary folders.
Discs that contain a mixture of music data and MP3, WMA or AAC format data cannot be played.
●Extensions
If the file extensions .mp3, .wma and .m4a are used for files other than MP3, WMA and AAC files, they may be mistakenly recognized and played as MP3, WMA and AAC files. This may result in large amounts of interference and damage to the speakers.
●Playback
• To play MP3 files with steady sound quality, we recommend a fixed bit rate of at least 128 kbps and a sampling frequency of 44.1 kHz.
• CD-R or CD-RW playback may not be possible in some instances, depending on the characteristics of the disc.
• There is a wide variety of freeware and other encoding software for MP3, WMA and AAC files on the market, and depending on the status of the encoding and the file format, poor sound quality or noise at the start of playback may result. In some cases, playback may not be possible at all.
• When files other than MP3, WMA or AAC files are recorded on a disc, it may take more time to recognize the disc and in some cases, playback may not be possible at all.
• Microsoft, Windows, and Windows Media are the registered trademarks of Microsoft Corporation in the U.S.A. and other countries.
• This system can playback AAC files encorded by iTunes.
NOTICE
■Discs and adapters that cannot be used
Do not use the following types of CDs.
Also, do not use 3 in. (8 cm) CD adapters, Dual Discs or printable discs.
Doing so may damage the CD player and/or the CD insert/eject function.
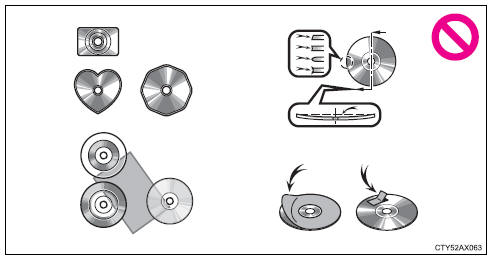
●Discs that have a diameter that is not 4.7 in. (12 cm).
●Low-quality or deformed discs.
●Discs with a transparent or translucent recording area.
●Discs that have tape, stickers or CD-R labels attached to them, or that have had the label peeled off.
■Player precautions
Failure to follow the precautions below may result in damage to the discs or the player itself.
●Do not insert anything other than discs into the disc slot.
●Do not apply oil to the player.
●Store discs away from direct sunlight.
●Never try to disassemble any part of the player.
Listening to an iPod
Connecting an iPod enables you to enjoy music from the vehicle speakers.
Select “iPod” on the “Select Audio Source” screen.
When the iPod connected to the system includes iPod video, the system can only output the sound by selecting the browse screen.
Connecting an iPod
Audio control screen
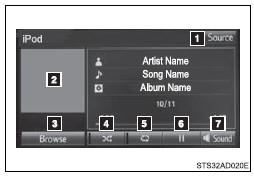
1. “Select Audio Source” screen appears
2. Displays cover art
3. Selecting the play mode
4. Shuffle play
5. Repeat play
6. Pause
Select  to resume playback
7. Setting the sound
Selecting a play mode
 Select “Browse” on the “iPod” screen.
 Select the desired play mode by selecting the “Playlists”, “Artists”, “Albums”, “Songs”, “Podcasts”, “Audio books”, “Genres”, “Composers” or “Video”. Then select a song to begin using the selected play mode.
■About iPod

●“Made for iPod”, “Made for iPhone” and “Made for iPad” mean that an electronic accessory has been designed to connect specifically to iPod or iPhone, or iPad, respectively, and has been certified by the developer to meet Apple performance standards.
●Apple is not responsible for the operation of this device or its compliance with safety and regulatory standards. Please note that the use of this accessory with iPod, iPhone or iPad may affect wireless performance.
●iPad, iPhone, iPod, iPod classic, iPod nano, and iPod touch are trademarks of Apple Inc., registered in the U.S. and other countries. Lightning is a trademark of Apple Inc.
■iPod cover art
●Depending on the iPod and songs in the iPod, iPod cover art may be displayed.
●This function can be changed to on/off. (→P. 262) ●It may take time to display iPod cover art, and the iPod may not be operated while the cover art display is in process.
●Only iPod cover art that is saved in JPEG format can be displayed.
■iPod functions
●When an iPod is connected and the audio source is changed to iPod mode, the iPod will resume play from the same point in which it was last used.
●Depending on the iPod that is connected to the system, certain functions may not be available. If a function is unavailable due to a malfunction (as opposed to a system specification), disconnecting the device and reconnecting it may resolve the problem.
●While connected to the system, the iPod cannot be operated with its own controls. It is necessary to use the controls of the vehicle’s multimedia system instead.
●When the battery level of an iPod is very low, the iPod may not operate. If so, charge the iPod before use.
●Compatible models
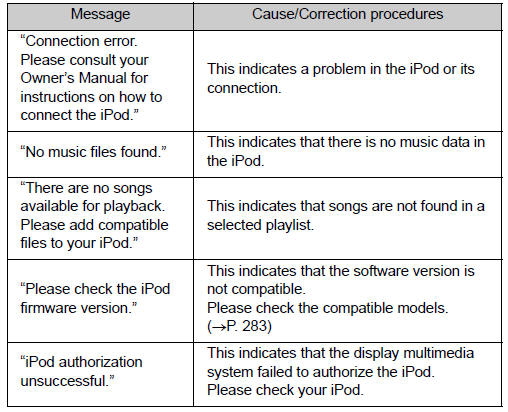
■iPod problems
To resolve most problems encountered when using your iPod, disconnect your iPod from the vehicle iPod connection and reset it. For instructions on how to reset your iPod, refer to your iPod Owner’s Manual.
■Error messages
■Compatible models
The following iPod®, iPod nano®, iPod classic®, iPod touch® and iPhone® devices can be used with this system.
●Made for
• iPod touch (5th generation)
• iPod touch (4th generation)
• iPod touch (3rd generation)
• iPod touch (2nd generation)
• iPod touch (1st generation)
• iPod classic
• iPod with video
• iPod nano (7th generation)
• iPod nano (6th generation)
• iPod nano (5th generation)
• iPod nano (4th generation)
• iPod nano (3rd generation)
• iPod nano (2nd generation)
• iPod nano (1st generation)
• iPhone 5
• iPhone 4S
• iPhone 4
• iPhone 3GS
• iPhone 3G
• iPhone
Depending on differences between models or software versions etc., some models might be incompatible with this system.
CAUTION
■While driving
Do not connect an iPod or operate the controls.
NOTICE
■To prevent damage to the iPod or its terminals
●Do not leave the iPod in the vehicle. The temperature inside the vehicle may become high, resulting in damage to the iPod.
●Do not push down on or apply unnecessary pressure to the iPod while it is connected.
●Do not insert foreign objects into the port.
Listening to a USB memory device
Connecting a USB memory device enables you to enjoy music from the vehicle speakers.
Select “USB” on the “Select Audio Source” screen.
Connecting a USB memory device
Audio control screen
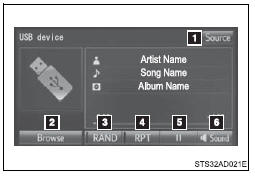
1. “Select Audio Source” screen appears
2. Displaying the folder list
3. Random playback
4. Repeat play
5. Pause
Select  to resume playback
6. Setting the sound
■USB memory functions
●Depending on the USB memory device that is connected to the system, the device itself may not be operable and certain functions may not be available. If the device is inoperable or a function is unavailable due to a malfunction (as opposed to a system specification), disconnecting the device and reconnecting it may resolve the problem.
●If the USB memory device still does not begin operation after being disconnected and reconnected, format the memory.
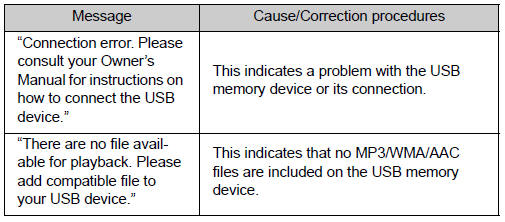
■Error messages for USB memory
■USB memory
●Compatible devices
USB memory device that can be used for MP3, WMA and AAC playback.
●Compatible device formats
The following device format can be used: • USB communication format: USB2.0 FS (12 Mbps), USB2.0 HS (480 Mbps) • File system format: FAT16/32 (Windows)
• Correspondence class: Mass storage class
MP3, WMA and AAC files written to a device with any format other than those listed above may not play correctly, and their file names and folder names may not be displayed correctly.
Items related to standards and limitations are as follows:
• Maximum directory hierarchy: 8 levels
• Maximum number of folders in a device: 3000 (including the root)
• Maximum number of files in a device: 9999
• Maximum number of files per folder: 255
●MP3, WMA and AAC files
MP3 (MPEG Audio LAYER 3) is a standard audio compression format.
Files can be compressed to approximately 1/10 of their original size using MP3 compression.
WMA (Windows Media Audio) is a Microsoft audio compression format. This format compresses audio data to a size smaller than that of the MP3 format.
AAC is short for Advanced Audio Coding and refers to an audio compression technology standard used with MPEG2 and MPEG4.
MP3, WMA and AAC file and media/formats compatibility are limited.
●MP3 file compatibility
• Compatible standards MP3 (MPEG1 AUDIO LAYER3, MPEG2 AUDIO LAYER3)
• Compatible sampling frequencies
MPEG1 AUDIO LAYER3: 32, 44.1, 48 (kHz)
MPEG2 AUDIO LAYER3: 16, 22.05, 24 (kHz)
• Compatible bit rates (compatible with VBR)
MPEG1 AUDIO LAYER3: 32-320 (kbps)
MPEG2 AUDIO LAYER3: 8-160 (kbps)
• Compatible channel modes: stereo, joint stereo, dual channel and monaural
●WMA file compatibility
• Compatible standards
WMA Ver. 7, 8, 9
• Compatible sampling frequencies
HIGH PROFILE 32, 44.1, 48 (kHz)
• Compatible bit rates
HIGH PROFILE 48-320 (kbps, VBR)
●AAC file compatibility
• Compatible standards
MPEG4/AAC-LC
• Compatible sampling frequencies
11.025/12/16/22.05/24/32/44.1/48 (kHz)
• Compatible bit rates
16-320 (kbps)
• Compatible channel modes: 1 ch and 2 ch
●File names
The only files that can be recognized as MP3/WMA/AAC and played are those with the extension .mp3 or .wma.
●ID3, WMA and AAC tags
ID3 tags can be added to MP3 files, making it possible to record the track title, artist name, etc.
The system is compatible with ID3 Ver. 1.0, 1.1, and Ver. 2.2, 2.3 ID3 tags.
(The number of characters is based on ID3 Ver. 1.0 and 1.1.) WMA tags can be added to WMA files, making it possible to record the track title and artist name in the same way as with ID3 tags.
AAC tags can be added to AAC files, making it possible to record the track title and artist name in the same way as with ID3 tags.
●MP3, WMA and AAC playback
• When a device containing MP3, WMA and AAC files is connected, all files in the USB memory device are checked. Once the file check is finished, the first MP3, WMA and AAC file is played. To make the file check finish more quickly, we recommend that you do not include any files other than MP3, WMA and AAC files or create any unnecessary folders.
• When a USB memory device is connected and the audio source is changed to USB memory mode, the USB memory device will start playing the first file in the first folder. If the same device is removed and reconnected (and the contents have not been changed), the USB memory device will resume play from the same point in which it was last used.
●Extensions
If the file extensions .mp3, .wma and .m4a are used for files other than MP3, WMA and AAC files, they will be skipped (not played).
●Playback
To play MP3 files with steady sound quality, we recommend a fixed bit rate of at least 128 kbps and a sampling frequency of 44.1 kHz.
• There is a wide variety of freeware and other encoding software for MP3, WMA and AAC files on the market, and depending on the status of the encoding and the file format, poor sound quality or noise at the start of playback may result. In some cases, playback may not be possible at all.
• Microsoft, Windows, and Windows Media are the registered trademarks of Microsoft Corporation in the U.S.A. and other countries.
CAUTION
■While driving
Do not connect a USB memory device or operate the device controls.
NOTICE
■To prevent damage to the USB memory device or its terminals
●Do not leave the USB memory device in the vehicle. The temperature inside the vehicle may become high, resulting in damage to the USB memory device.
●Do not push down on or apply unnecessary pressure to the USB memory device while it is connected.
●Do not insert foreign objects into the port.
Using the AUX port
To use the AUX port, connect a portable player, then select “AUX” on the “Select Audio Source” screen.
Connecting a portable audio player
■Operating portable audio players connected to the multimedia system
The volume can be adjusted using the vehicle’s audio controls. All other adjustments must be made on the portable audio player itself.
■When using a portable audio player connected to the power outlet
Noise may occur during playback. Use the power source of the portable audio player.
CAUTION
■While driving
Do not connect a portable audio player or operate the device controls.
Download Manual