Using other driving systems
Cruise control
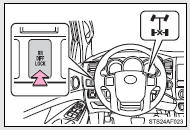
Use the cruise control to maintain a set speed without depressing the accelerator pedal.
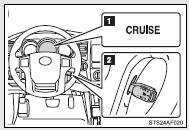
 Indicator
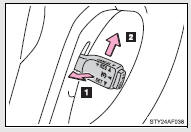
 Cruise control switch
■ Setting the vehicle speed
Press the ON-OFF button to activate the cruise control.
Cruise control indicator will come on.
Press the button again to deactivate the cruise control.
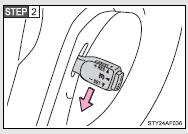
Accelerate or decelerate the vehicle to the desired speed, and push the lever down to set the speed.
The vehicle speed at the moment the lever is released becomes the set speed.
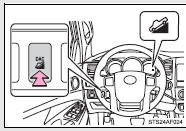
■ Adjusting the set speed
To change the set speed, operate the lever until the desired set speed is obtained.
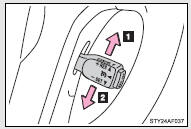
 Increases the speed
 Decreases the speed
Fine adjustment: Momentarily move the lever in the desired direction.
Large adjustment: Hold the lever in the desired direction.
The set speed will be increased or decreased as follows: Fine adjustment: By approximately 1 mph (1.6 km/h) each time the lever is operated.
Large adjustment: The set speed can be increased or decreased continually until the lever is released.
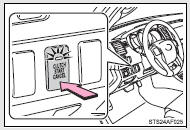
■ Canceling and resuming the constant speed control
 Pulling the lever toward you cancels the constant speed control.
The speed setting is also canceled when the brakes are applied or the clutch pedal (manual transmission only) is depressed.
 Pushing the lever up resumes the constant speed control.
Resuming is available when the vehicle speed is more than approximately 25 mph (40 km/h).
■Cruise control can be set when
●The shift lever is in the D or range 4. (vehicles with 5-speed automatic transmission) ●The shift lever is in the D or range 3. (vehicles with 4-speed automatic transmission) ●Vehicle speed is above approximately 25 mph (40 km/h).
■Accelerating after setting the vehicle speed
●The vehicle can be accelerated normally. After acceleration, the set speed resumes.
●Even without canceling the cruise control, the set speed can be increased by first accelerating the vehicle to the desired speed and then pushing the lever down to set the new speed.
■Automatic cruise control cancelation
Cruise control will stop maintaining the vehicle speed in any of the following situations.
●Actual vehicle speed falls more than approximately 10 mph (16 km/h) below the preset vehicle speed.
At this time, the memorized set speed is not retained.
●Actual vehicle speed is below approximately 25 mph (40 km/h).
●VSC is activated.
■If the cruise control indicator light flashes
Press the ON-OFF button once to deactivate the system, and then press the button again to reactivate the system.
If the cruise control speed cannot be set or if the cruise control cancels immediately after being activated, there may be a malfunction in the cruise control system. Have the vehicle inspected by your Toyota dealer.
CAUTION
■To avoid operating the cruise control by mistake
Switch the cruise control off using the ON-OFF button when not in use.
■Situations unsuitable for cruise control
Do not use cruise control in any of the following situations.
Doing so may result in loss of control and could cause an accident resulting in death or serious injury.
●In heavy traffic
●On roads with sharp bends
●On winding roads
●On slippery roads, such as those covered with rain, ice or snow
●On steep hills
Vehicle speed may exceed the set speed when driving down a steep hill.
●When your vehicle is towing a trailer or during emergency towing
Rear view monitor system
The rear view monitor system assists the driver by displaying guide lines and an image of the view behind the vehicle while backing up, for example while parking.
The screen illustrations used in this text are intended as examples, and may differ from the image that is actually displayed on the screen.
 Vehicles with Entune Audio Plus or Entune Premium Audio
Refer to the “NAVIGATION SYSTEM OWNER’S MANUAL”.
 Vehicles with Entune Audio
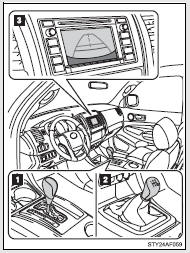
The rear view image is displayed when the shift position is in R and the engine switch is in the “ON” position.
The rear view monitor system will be deactivated when the shift lever is in any position other than R.
 Automatic transmission
 Manual transmission
 Screen
Using the rear view monitor system
■ Screen description

 Vehicle width guide lines
The line indicates a guide path when the vehicle is being backed straight up.
The displayed width is wider than the actual vehicle width.
 Vehicle center guide lines
These lines indicate the estimated vehicle center on the ground.
 Distance guide line
The line shows points approximately 1.5 ft. (0.5 m) (red) from the center of the edge of the bumper.
 Distance guide line
The line shows distance behind the vehicle, a point approximately 3 ft.
(1 m) (blue) from the edge of the bumper.
Rear view monitor system precautions
■ Area displayed on screen
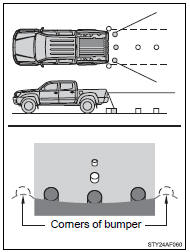
The rear view monitor system displays an image of the view from the bumper of the rear area of the vehicle.
To adjust the image on the rear view monitor system screen.
• The area displayed on the screen may vary according to vehicle orientation conditions.
• Objects which are close to either corner of the bumper or under the bumper cannot be seen on the screen.
• The camera uses a special lens.
The distance of the image that appears on the screen differs from the actual distance.
• Items which are located higher than the camera may not be displayed by the monitor.
■ Rear view monitor system camera

The camera for the rear view monitor system is located as shown in the illustration.
● Using the camera
If the camera lens becomes dirty, it cannot transmit a clear image.
If water droplets, snow or mud adhere to the lens, rinse it with water and wipe with a soft cloth. If the lens is extremely dirty, wash it with a mild cleanser and rinse.
■ Differences between the screen and the actual road
The distance guide lines and the vehicle width guide lines may not actually be parallel with the dividing lines of the parking space, even when they appear to be so. Be sure to check visually.
The distances between the vehicle width guide lines and the left and right dividing lines of the parking space may not be equal, even when they appear to be so. Be sure to check visually.
The distance guide lines give a distance guide for flat road surfaces.
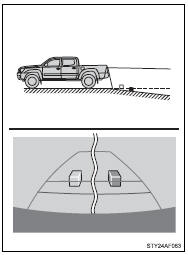
In any of the following situations, there is a margin of error between the fixed guide lines on the screen and the actual distance/ course on the road.
● When the ground behind the vehicle slopes up sharply
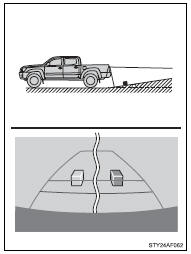
The distance guide lines will appear to be closer to the vehicle than the actual distance.
Because of this, objects will appear to be farther away than they actually are. In the same way, there will be a margin of error between the guidelines and the actual distance/course on the road.
● When the ground behind the vehicle slopes down sharply
The distance guide lines will appear to be further from the vehicle than the actual distance.
Because of this, objects will appear to be closer than they actually are. In the same way, there will be a margin of error between the guidelines and the actual distance/course on the road.
● When any part of the vehicle sags

When any part of the vehicle sags due to the number of passengers or the distribution of the load, there is a margin of error between the fixed guide lines on the screen and the actual distance/ course on the road.
■ When approaching three-dimensional objects
The distance guide lines are displayed according to flat surfaced objects (such as the road). It is not possible to determine the position of three-dimensional objects (such as vehicles) using the distance guide lines. When approaching a three-dimensional object that extends outward (such as the flatbed of a truck), be careful of the following.
● Distance guidelines
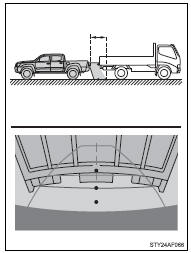
Visually check the surroundings and the area behind the vehicle.
On the screen, it appears that a truck is parked at point  . However, in reality if you back up to point
  , you will hit the truck. On the screen, it appears that
  is closest and
  is furthest away.
However, in reality, the distance to  and
and  is the same, and
  is farther than
  and
and  .
.
■ Vehicle width guide lines
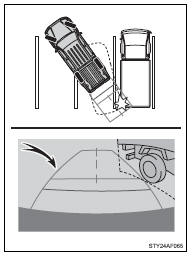
Visually check the surroundings and the area behind the vehicle.
In the case shown below, the truck appears to be outside of the vehicle width guide lines and the vehicle does not look as if it hits the truck. However, the rear body of the truck may actually cross over the vehicle width guide lines. In reality if you back up as guided by the vehicle width guide lines, the vehicle may hit the truck.
Things you should know
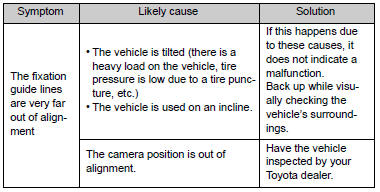
■ If you notice any symptoms
If you notice any of the following symptoms, refer to the likely cause and the solution, and re-check.
If the symptom is not resolved by the solution, have the vehicle inspected by your Toyota dealer.

CAUTION
■When using the rear view monitor system
The rear view monitor system is a supplemental device intended to assist the driver when backing up. When backing up, be sure to check visually behind and all around the vehicle before proceeding.
Observe the following precautions to avoid an accident that could result in death or serious injuries.
●Never depend on the rear view monitor system entirely when backing up.
The image and the position of the guide lines displayed on the screen may differ from the actual state.
Use caution, just as you would when backing up any vehicle.
●Be sure to back up slowly, depressing the brake pedal to control vehicle speed.
●The instructions given are only guidelines.
When and how much to turn the steering wheel will vary according to traffic conditions, road surface conditions, vehicle condition, etc., when parking.
It is necessary to be fully aware of this before using the rear view monitor system.
●When parking, be sure to check that the parking space will accommodate your vehicle before maneuvering into it.
●Do not use the rear view monitor system in the following cases:
• On icy or slick road surfaces, or in snow
• When using tire chains or the compact spare tire
• When the tailgate is not closed completely
• On roads that are not flat or straight, such as curves or slopes.
●In low temperatures, the screen may darken or the image may become faint. The image could distort when the vehicle is moving, or you may become unable to see the image on the screen. Be sure to directly check visually and with the mirrors all around the vehicle before proceeding.
●If the tire sizes are changed, the position of the fixed guide lines displayed on the screen may change.
●The camera uses a special lens. The distances between objects and pedestrians that appear in the image displayed on the screen will differ from the actual distances.
NOTICE
■How to use the camera
●The rear view monitor system may not operate properly in the following cases.
• If the back of the vehicle is hit, the position and mounting angle of the camera may change.
• As the camera has a water proof construction, do not detach, disassemble or modify it. This may cause incorrect operation.
• Do not strongly rub the camera lens. If the camera lens is scratched, it cannot transmit a clear image.
• Do not allow organic solvent, car wax, window cleaner or glass coat to adhere to the camera. If this happens, wipe it off as soon as possible.
• If the temperature changes rapidly, such as when hot water is poured on the vehicle in cold weather, the system may not operate normally.
• When washing the vehicle, do not apply intensive bursts of water to the camera or camera area. Doing so may result in the camera malfunctioning.
• When the camera is used under fluorescent lights, sodium light or mercury light, etc., the lights and the illuminated areas may appear to flicker.
●Do not expose the camera to strong impact as this could cause a malfunction.
If this happens, have the vehicle inspected by your Toyota dealer as soon as possible.
Four-wheel drive system
Use the front-wheel drive control switch to select the following transfer modes.
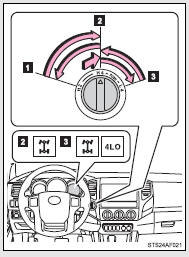
 H2 (high speed position, two-wheel drive)
Use this for normal driving on dry hard-surfaced roads.
This position gives greater economy, quietest ride and least wear.
 H4 (high speed position, four-wheel drive)
Use this for driving only on tracks that permit the tires slide, like off-road, icy or snow-covered roads. This position provides greater traction than two-wheel drive.
The four-wheel drive indicator comes on.
 L4 (low speed position, four-wheel drive)
Use this for maximum power and traction. Use L4 for climbing or descending steep hills, off-road driving, and hard pulling in sand, mud or deep snow.
The four-wheel drive and 4LO indicators come on.
Shifting between H4 and L4
■ Shifting from H4 to L4
 Automatic transmission
 Stop the vehicle completely with brake pedal help down.
 Shift the shift lever to N.
 Push and turn the front-wheel drive control switch fully clockwise.
If the four-wheel drive indicator flashes and the buzzer sounds, try the above steps again.
 Manual transmission
 Stop the vehicle or reduce your speed to less than 2 mph (3 km/h).
 Depress and hold the clutch pedal.
 Push and turn the front-wheel drive control switch fully clockwise.
If the four-wheel drive indicator flashes and the buzzer sounds, try the above steps again.
■ Shifting from L4 to H4
 Automatic transmission
 Stop the vehicle completely with brake pedal help down.
 Shift the shift lever to N.
 Turn the front-wheel drive control switch counterclockwise.
If the four-wheel drive indicator flashes and the buzzer sounds, try the above steps again.
Manual transmission
Stop the vehicle or reduce your speed to less than 2 mph (3 km/h).
Depress and hold the clutch pedal.
Turn the front-wheel drive control switch counterclockwise.
If the four-wheel drive indicator flashes and the buzzer sounds, try the above steps again.
■Shifting between H2 and H4
●Shifting from H2 to H4
Reduce the vehicle speed to less than 62 mph (100 km/h) and turn the front-wheel drive control switch fully clockwise.
●Shifting from H4 to H2
Turn the front-wheel drive control switch fully counterclockwise.
This can be done at any speed. You need not depress the clutch pedal.
(manual transmission)
■If the four-wheel drive indicator light or the 4LO indicator light blinks
●Shifting from H2 to H4
• If the four-wheel drive indicator continues to blink, drive straight ahead while accelerating or decelerating.
• If the four-wheel drive indicator continues to blink and the buzzer sounds, stop the vehicle or reduce the vehicle speed to less than 62 mph (100 km/h). Operate the switch again.
●Shifting from H4 to H2
If the four-wheel drive indicator continues to blink, drive straight ahead while accelerating or decelerating, or drive forward or backward in a short distance.
●Shifting to H4 or L4
 Automatic transmission
If the 4LO indicator continues to blink when you operate the front-wheel drive control switch to the H4 or L4 position, drive forward or backward in a short distance, then stop the vehicle completely, shift the shift lever securely to N and operate the switch again.
 Manual transmission
If the 4LO indicator continues to blink when you operate the front-wheel drive control switch to the H4 or L4 position, drive forward or backward in a short distance, then stop the vehicle completely, depress the clutch pedal and operate the switch again.
If the indicator light continues to blink even if doing so, contact your Toyota dealer as soon as possible. There may be a trouble in the four-wheel drive system.
■Shifting to L4
VSC is automatically turned off.
■Four-wheel drive usage frequency
You should drive in four-wheel drive for at least 10 miles (16 km) each month.
This will assure that the front-drive components are lubricated.
CAUTION
■Caution while driving
●Never shift the front-wheel drive control switch from H2 to H4 if the wheels are slipping.
Stop the slipping or spinning before shifting.
●For normal driving on dry and hard surface roads, use H2 position. Driving on dry and hard surface roads in H4 or L4 position may cause drive component oil leakage, seizure, or other problems resulting in an accident.
Further, it may cause tire wear and increased fuel consumption.
●Avoid turning suddenly in H4 or L4 position. If you do turn suddenly, the difference in turning speeds between the front and rear wheels may have a similar effect to braking, thus making driving difficult.
Active traction control system
The active traction control system automatically helps prevent the spinning of 4 wheels when the vehicle is started or accelerated on slippery road surfaces.
■ System operation
 Vehicles with an automatic transmission: Stop the vehicle, shift the shift lever to N and put the frontwheel drive control switch in the L4 position.
Vehicles with a manual transmission: Stop the vehicle or reduce your speed to less than 2 mph (3 km/h). Depress the clutch pedal and put the front-wheel drive control switch in the L4 position.
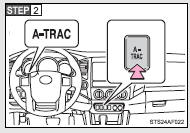
Press the A-TRAC switch to activate the system.
At this time, the active traction control system indicator will come on.
To cancel the system, push the switch again.
When the active traction control system is operating
If four wheels spin, the slip indicator flashes to indicate that the active traction control system has been engaged.
■When the rear differential is locked (vehicles with the rear differential lock system)
The active traction control system is activated only when the vehicle speed is less than 3 mph (6 km/h).
■Sounds and vibrations caused by the active traction control system
●A sound may be heard from the engine compartment when the engine is started or just after the vehicle begins to move. This sound does not indicate that a malfunction has occurred in the system.
●Vibrations may be felt through the vehicle body and steering. It may occur when the system is operating.
■If the brake system overheats
The system will cease operation, a buzzer will sound and A-TRAC indicator blink to alert the driver. Stop the vehicle in a safe place. (There is no problem with continuing normal driving.) The system will be automatically restored after a short time.
CAUTION
■The active traction control system may not operate effectively when
Directional control and power may not be achievable while driving on slippery road surfaces, even if the active traction control system is operating.
Do not drive the vehicle in conditions where stability and power may be lost.
AUTO LSD system
The AUTO LSD system aids traction by using the traction control system to control engine performance and braking when one of the rear wheels begins to spin.
The system should be used only when one of the rear wheels spinning occurs in a ditch or rough surface.
■ System operation
The system can be used on 2WD models and in 2WD mode on 4WD models.
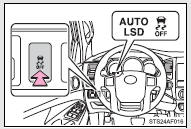
Press the VSC OFF switch to turn on the system.
At this time, the AUTO LSD and VSC OFF indicators will come on simultaneously.
To turn off the system, push the switch again.
If the engine is turned off while the AUTO LSD indicator is on and then restarted, the indicator will turn off automatically.
When the AUTO LSD system is operating
If the rear wheels spin, the slip indicator flashes to indicate that the AUTO LSD system has been controlled the spinning of the rear wheels.
■If the engine is turned off and restarted
The AUTO LSD system and the indicators are automatically turned off.
■Reactivation of the VSC system linked to vehicle speed
When the AUTO LSD system is turned on, the VSC system will turn on automatically if vehicle speed increases.
■If the brake system overheats
The system will cease operation and a buzzer will sound to alert the driver.
Stop the vehicle in a safe place. (There is no problem with continuing normal driving.) The system will be automatically restored after a short time.
CAUTION
■To avoid an accident
●Do not use the AUTO LSD system in conditions other than the above.
A much greater steering effort and more careful cornering control will be required.
●Do not drive with the AUTO LSD system continuously turned on.
Rear differential lock system
The rear differential lock system is provided for use only when wheel spinning occurs in a ditch or on a slippery or rugged surface.
The rear differential lock system is effective in case one of the rear wheels is spinning.
Press the RR DIFF LOCK switch to lock the rear differential.
At this time, the indicator will blink. Wait a few seconds for the system to complete operation.
After the rear differential is locked, the rear differential lock indicator will stop blinking and remain on.
To unlock the rear differential, push the switch again.
Using the rear differential lock system
 Automatic transmission
 4WD models: Before using the rear differential lock system.
Stop the vehicle, shift the shift lever to N and put the frontwheel drive control switch in the L4 position to see if this is sufficient. If this has no effect, additionally use the rear differential lock system.
 Be sure to stop the wheels.
 Press the RR DIFF LOCK switch.
After the rear differential is locked, the indicator will come on.
 Gently depress the accelerator pedal.
Unlock the rear differential as soon as the vehicle moves.
To unlock the rear differential, push the switch again.
 Manual transmission
 4WD models: Before using the rear differential lock system.
Stop the vehicle or reduce your speed to less than 2 mph (3 km/h). Depress the clutch pedal and put the front-wheel drive control switch in the L4 position to see if this is sufficient. If this has no effect, additionally use the rear differential lock system.
 Be sure to stop the wheels.
 Depress the clutch pedal.
 Press the RR DIFF LOCK switch.
After the rear differential is locked, the indicator will come on.
 Slowly release the clutch pedal.
Unlock the rear differential as soon as the vehicle moves.
To unlock the rear differential, push the switch again.
■Locking the rear differential
●When the rear differential is locked, VSC is automatically turned off.
(The rear differential lock and VSC OFF indicators come on.) ●The following systems do not operate when the rear differential is locked.
It is normal operation for the ABS warning light and VSC OFF indicator to be on at this time. If the DAC switch turns on, the downhill assist control system indicator light flashes.
• ABS
• Brake assist system
• VSC
• TRAC
• Downhill assist control system
• Hill-start assist control system
■The rear differential lock is disengaged when
Shift the front-wheel drive control switch to H2 or H4 position. (4WD models) Never forget to turn off the switch after using this feature.
■After unlocking the rear differential
To check that the indicator goes off, turn the engine switch to the ON position, but do not start the engine.
CAUTION
■To avoid an accident
●Do not use the rear differential lock system except when wheel spinning occurs in a ditch or on a slippery or ragged surface. Large steering effort and careful cornering control will be required.
●Do not lock the rear differential until the wheels have stopped spinning.
Otherwise, the vehicle may move in an unexpected direction when the differential lock is engaged, resulting in an accident. This may also lead to possible damage to differential lock component parts.
●Do not drive over 5 mph (8 km/h) when the differential is locked.
●Do not keep driving with the RR DIFF LOCK switch on.
Downhill Assist Control system
The downhill assist control system helps to prevent excessive speed on steep downhill descents.
■ System operation
The system will operate when the vehicle is traveling under 15 mph (25 km/h) and the front-wheel drive control switch is in the L4 position.
Press the DAC switch. The indicator will come on, and the system will operate.
With the vehicle traveling at a speed of 15 mph (25 km/h) or less, release your foot from the accelerator or brake pedal to activate the system.
When the system is in operation, the slip indicator will flash, and the stop lights/high mounted stop light will come on. A sound may also occur during the operation. This does not indicate a malfunction.
■ Turning off the system
Press the DAC switch while the system is in operation. The indicator will flash as the system gradually ceases operation, and will turn off when the system is fully off.
Pressing the DAC switch while the indicator is flashing will start the system again.
■Operating tips
The system will operate when the shift lever is in a position other than P.
However, to make effective use of the system it is recommended that the shift lever be shifted to 2 or L.
■The system will not operate when
●The front-wheel drive control switch is in the H2 or H4 position.
●The rear differential is locked.
■The downhill assist control system indicator light flashes when
●The shift lever is in the N position.
●The front-wheel drive control switch is in the H2 or H4 position.
●The rear differential is locked.
■If the brake system overheats
The system will cease operation and a buzzer will sound to alert the driver.
Stop the vehicle in a safe place. (There is no problem with continuing normal driving.)
■System malfunction
●The downhill assist control system indicator does not come on when the engine switch is turned to the ON position.
●The downhill assist control system indicator does not come on when the DAC switch is pressed.
In the above cases have your vehicle checked by your Toyota dealer.
CAUTION
■Do not rely excessively on the downhill assist control system
It may not be able to maintain a low speed over road surfaces on which sliding can easily occur, such as extremely steep slopes or icy or muddy roads.
Clutch start cancel switch
The switch allows the vehicle to be driven out of difficult situations by cranking the engine with the clutch engaged.
Never use the switch for normal engine starting. Be sure to follow the starting procedure.
Press the CLUTCH START CANCEL switch to cancel the clutch start system when the engine switch is turned to the ON position.
The indicator comes on when the clutch start system is canceled.
The clutch start cancel switch is automatically turned off when the engine switch is turned off.
■Clutch start system
The system is designed to keep the starter motor from operating if the clutch pedal is not depressed all the way down.
Driving assist systems
To help enhance driving safety and performance, the following systems operate automatically in response to various driving situations.
Be aware, however, that these systems are supplementary and should not be relied upon too heavily when operating the vehicle.
■ ABS (Anti-lock Brake System)
Helps to prevent wheel lock when the brakes are applied suddenly, or if the brakes are applied while driving on a slippery road surface.
■ Brake assist
Generates an increased level of braking force after the brake pedal is depressed, while the system detects a panic stop situation.
■ VSC (Vehicle Stability Control)
Helps the driver to control skidding when swerving suddenly or turning on slippery road surfaces.
■ Trailer Sway Control (vehicles with towing hitch and 7 pin connector)
Helps the driver to control trailer sway by selectively applying brake pressure for individual wheels and reducing engine torque when trailer sway is detected.
Trailer Sway Control is part of the VSC system and will not operate if VSC is turned off or experiences a malfunction.
■ TRAC (Traction Control)
Helps to maintains drive power and prevent the drive wheels from spinning when starting the vehicle or accelerating on slippery roads.
■ Hill-start assist control (if equipped)
Helps prevent the vehicle from rolling backwards when starting on an incline or slippery slope. It operates for approximately 5 seconds at maximum.
When the VSC/Trailer Sway Control/TRAC/hill-start assist control systems are operating
The slip indicator will flash while the VSC/Trailer Sway Control/ TRAC/hill-start assist control systems are operating.
The stop lights and high mounted stoplight turn on when the hill-start assist control system or Trailer Sway Control is operating.
To disable VSC, Trailer Sway Control and TRAC (2WD models and 2WD mode on 4WD models)
If the vehicle gets stuck in fresh snow or mud, VSC, Trailer Sway Control and TRAC may reduce power from the engine to the wheels.
You may need to turn the system off to enable you to rock the vehicle in order to free it.
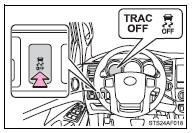
■ Turning off TRAC, VSC and Trailer Sway Control
Press and hold the VSC OFF switch for more than 3 seconds while the vehicle is stopped to turn off TRAC, VSC and Trailer Sway Control.
The VSC OFF and TRAC OFF indicators will come on.
Push the switch again to turn both systems back on.
To disable VSC, Trailer Sway Control and/or TRAC (4WD mode on 4WD models)
If the vehicle gets stuck in fresh snow or mud, VSC, Trailer Sway Control and TRAC may reduce power from the engine to the wheels.
You may need to turn the system off to enable you to rock the vehicle in order to free it.
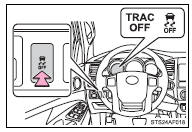
■ Turning off TRAC
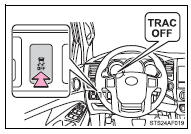
Quickly push and release the VSC OFF switch to turn off TRAC.
The TRAC OFF indicator will come on.
Push the switch again to turn the system back on.
■ Turning off TRAC, VSC and Trailer Sway Control
Press and hold the VSC OFF switch for more than 3 seconds while the vehicle is stopped to turn off TRAC, VSC and Trailer Sway Control.
The VSC OFF and TRAC OFF indicators will come on.
Push the switch again to turn both systems back on.
■When the TRAC OFF indicator light comes on even if the VSC OFF switch has not been pressed
TRAC, hill-start assist control, downhill assist control system cannot be operated.
Contact your Toyota dealer.
■Reactivation of the TRAC, VSC and Trailer Sway Control systems after turning off the engine
Turning off the engine after turning off the TRAC, VSC and Trailer Sway Control systems will automatically reactivate them.
■Automatic TRAC reactivation (AUTO LSD mode)
With AUTO LSD mode, VSC OFF and AUTO LSD indicator lights turn on.
The TRAC system will turn on when the vehicle speed increases.
■Automatic TRAC, VSC and Trailer Sway Control reactivation
If the TRAC, VSC and Trailer Sway Control systems are turned off, the systems will not turn on even when vehicle speed increases.
■Sounds and vibrations caused by the ABS, TRAC, VSC, Trailer Sway Control, brake assist and hill-start assist control system
●A sound may be heard from the engine compartment when the engine is started or just after the vehicle begins to move. This sound does not indicate that a malfunction has occurred in any of these systems.
●Any of the following conditions may occur when the above systems are operating. None of these indicates that a malfunction has occurred.
• Vibrations may be felt through the vehicle body and steering.
• A motor sound may be heard after the vehicle comes to a stop.
• The brake pedal may pulsate slightly when the ABS is activated.
• The brake pedal may move down slightly after the ABS is activated.
■Hill-start assist control is operational when (if equipped)
●The shift lever is in the D, 4, 3, 2 (5-speed automatic transmission), D, 3, 2 (4-speed automatic transmission) or L positions.
●The brake pedal is not depressed.
■Hill-start assist control will not operate when (if equipped)
●The shift lever is in the P, R or N positions.
●The rear differential is locked.
■If the brake system overheats
TRAC and hill-start control will cease operation and a buzzer will sound to alert the driver. Stop the vehicle in a safe place. (There is no problem with continuing normal driving.)
CAUTION
■The ABS does not operate effectively when
●The limits of tire gripping performance have been exceeded.
●The vehicle hydroplanes while driving at high speed on the wet or slick road.
■Stopping distance when the ABS is operating may exceed that of normal conditions
The ABS is not designed to shorten the vehicle’s stopping distance. Always maintain a safe distance from the vehicle in front of you, especially in the following situations.
●When driving on dirt, gravel or snow-covered roads
●When driving with tire chains
●When driving over bumps in the road
●When driving over roads with potholes or roads with uneven roads
■When VSC and Trailer Sway Control are activated
The slip indicator flashes. Always drive carefully. Reckless driving may cause an accident. Exercise particular care when the indicator flashes.
■TRAC may not operate effectively when
Directional control and power may not be achievable while driving on slippery road surfaces, even if TRAC is operating.
Do not drive the vehicle in conditions where stability and power may be lost.
■If the hill-start assist control does not operate effectively
Do not overly rely on the hill-start assist control. The hill start assist control may not operate effectively on steep inclines and roads covered in ice.
CAUTION
■Replacing tires
Make sure that all tires are of the same size, brand, tread pattern and total load capacity. In addition, make sure that the tires are inflated to the appropriate tire pressure level.
The ABS, VSC, TRAC and Trailer Sway Control will not function correctly if different tires are fitted on the vehicle.
Contact your Toyota dealer for further information when replacing tires or wheels.
■Handling of tires and suspension
Using tires with any kind of problem or modifying the suspension will affect the driving assist systems, and may cause the system to malfunction.
■Trailer Sway Control precaution
The Trailer Sway Control system is not able to reduce trailer sway in all situations.
Depending on many factors such as the conditions of the vehicle, trailer, road surface, and driving environment, the Trailer Sway Control system may not be effective. Refer to your trailer owner’s manual for information on how to tow your trailer properly.
■If trailer sway occurs
Observe the following precautions.
Failing to do so may cause death or serious injury.
●Firmly grip the steering wheel. Steer straight ahead.
Do not try to control trailer swaying by turning the steering wheel.
●Begin releasing the accelerator pedal immediately but very gradually to reduce speed.
Do not increase speed. Do not apply vehicle brakes.
If you make no extreme correction with the steering or brakes, your vehicle and trailer should stabilize.
Download Manual